Photographing Earrings
9:46 AM Posted In jewelry photography , photograpy Edit This 5 Comments »
I promised a fellow Etsy seller that I would produce a short tutorial on how I photograph earrings for my Etsy shop this weekend. I'm a little behind in getting it done but here it is. This technique probably won't work for other jewelry items and some may not like the results but I am pleased with them and have gotten positive responses from people who have seen them.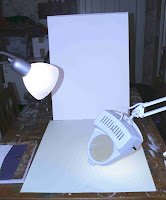
First, you need to set up a space for photography. You need lots of light but you don't want to take photos outside because direct sun can be too harsh, causing too much contrast and dazzle. A light colored and/or well lit background is also essential as any item will get lost in a dark background. I set up a large piece of white or cream paper or poster-board on my studio table with a white or pale colored paper laying in front of it. My studio has 3 large windows but I also I use my swing arm lamp and my reading lamp for additional light that is positionable. This is the basic set up.
I like to have a colored or patterned background in some of my photos. I feel like having an interesting background for the initial photo draws a viewer's eye a little better. The trick is to make sure that the background does not overpower the earrings. I have a selection of specialty papers in patterns and textures that I experiment with as I'm photographing things. I've also tried fabric as a background but have found that it makes for a confusing image - are you shopping for fabric or for earrings? Patterned paper is more 2 dimensional and thus less confusing.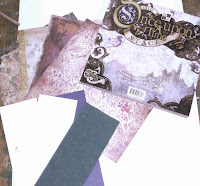
I like to photograph my earrings so that I have some photos with them hanging and some with them lying flat. This allows me to demonstrate the dangling or draping qualities of the earrings and the complete earring, including the ear hook design.
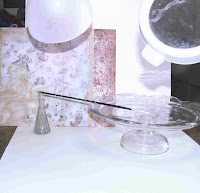 For a dangle station, I use a paintbrush and two fancy glass objects to suspend the brush between. I hang the earrings from the paintbrush and start photographing with several different backgrounds. (Do this when your three year old is asleep. When I took these photos, my little guy was in the studio helping mommy and every time he touched the table, the earrings began to swing - that's why these photos are a little fuzzy!) I shine one directional light on the earrings and one on the background. This eliminates shadows on the background. I set my camera on macro or super macro and get right in close to the earrings. This allows for incredible detail in the earrings and causes the background to soften a bit.
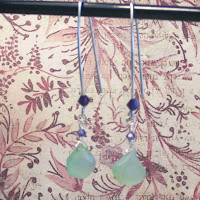
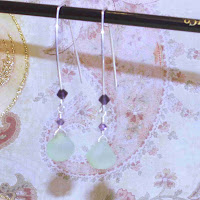 I try several different backgrounds. As you can see, the first background I chose was a bad match for these chalcedony earrings. They disappear against it because the colors are too similar. Plus, I forgot to turn on the reading lamp to shine on the background so I have harsh shadows behind the dangles.
The second background is better.
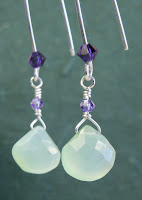
The dark green is perfect.
If you want to get a shot of both earrings, one in sharp focus and the other a bit softer either in the background or foreground, you need to set the camera at super macro and get as close to the earrings as possible with the hanging rod (paintbrush) angling away from you so that one earring is closer to you than its mate. Place the focus box on the earring you want to have in focus and take your photo.
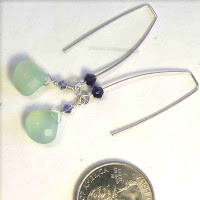
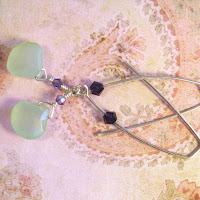
 Then I move on to photos of the earrings lying flat. I use directional lights for these as well, so that I can control where the shadows lie and what part of the jewelry to illuminate. I take at least one photo of the earrings on white or cream colored paper so that potential buyers can examine the product without any distractions. Throwing a quarter in there helps people gain a visual understanding of the size. I also like to photograph each pair on a pretty background. We are so accustomed to seeing jewelry as it is presented on the front pages of jewelry making magazines that I think buyers expect to see this sort of setting - it establishes a sense of familiarity and comfort. This photo shows that the background that did not work for dangling the earrings actually looks nice as the pretty background for photographing the earrings lying flat.
Once the photos are all done, I upload them to my computer and make necessary correction to color, exposure and cropping. I always crop first as this eliminates unnecessary dark and bright areas that would affect brightness adjustments. I always photograph at the highest quality available on my camera and then adjust the file size down after adjustments are made so that the photos load faster for viewers.
I hope that this wordy post is useful for someone. I have read lots of articles about photographing jewelry and have felt so intimidated by the recommendations of professionals, including the expensive accessories that are recommended. Maybe someday I will be able to afford a professional camera man for my jewelry, but in the meantime, I'll just continue with trial and error to find what works for me.
A note about copycats - I hope other beginners are able to use this information to improve their photos. So many people help, support and encourage me as I grow as an artist that I enjoy having something to share with others. Having said that, I also hope that I won't see photos of other sellers' items on Etsy that look like my exact product , photographed exactly the same way as mine. That would be rude and I would report it. Instead, use your imaginations and make your work your own!

First, you need to set up a space for photography. You need lots of light but you don't want to take photos outside because direct sun can be too harsh, causing too much contrast and dazzle. A light colored and/or well lit background is also essential as any item will get lost in a dark background. I set up a large piece of white or cream paper or poster-board on my studio table with a white or pale colored paper laying in front of it. My studio has 3 large windows but I also I use my swing arm lamp and my reading lamp for additional light that is positionable. This is the basic set up.
I like to have a colored or patterned background in some of my photos. I feel like having an interesting background for the initial photo draws a viewer's eye a little better. The trick is to make sure that the background does not overpower the earrings. I have a selection of specialty papers in patterns and textures that I experiment with as I'm photographing things. I've also tried fabric as a background but have found that it makes for a confusing image - are you shopping for fabric or for earrings? Patterned paper is more 2 dimensional and thus less confusing.

I like to photograph my earrings so that I have some photos with them hanging and some with them lying flat. This allows me to demonstrate the dangling or draping qualities of the earrings and the complete earring, including the ear hook design.
 For a dangle station, I use a paintbrush and two fancy glass objects to suspend the brush between. I hang the earrings from the paintbrush and start photographing with several different backgrounds. (Do this when your three year old is asleep. When I took these photos, my little guy was in the studio helping mommy and every time he touched the table, the earrings began to swing - that's why these photos are a little fuzzy!) I shine one directional light on the earrings and one on the background. This eliminates shadows on the background. I set my camera on macro or super macro and get right in close to the earrings. This allows for incredible detail in the earrings and causes the background to soften a bit.
 I try several different backgrounds. As you can see, the first background I chose was a bad match for these chalcedony earrings. They disappear against it because the colors are too similar. Plus, I forgot to turn on the reading lamp to shine on the background so I have harsh shadows behind the dangles.
The second background is better.


The dark green is perfect.
If you want to get a shot of both earrings, one in sharp focus and the other a bit softer either in the background or foreground, you need to set the camera at super macro and get as close to the earrings as possible with the hanging rod (paintbrush) angling away from you so that one earring is closer to you than its mate. Place the focus box on the earring you want to have in focus and take your photo.
 Then I move on to photos of the earrings lying flat. I use directional lights for these as well, so that I can control where the shadows lie and what part of the jewelry to illuminate. I take at least one photo of the earrings on white or cream colored paper so that potential buyers can examine the product without any distractions. Throwing a quarter in there helps people gain a visual understanding of the size. I also like to photograph each pair on a pretty background. We are so accustomed to seeing jewelry as it is presented on the front pages of jewelry making magazines that I think buyers expect to see this sort of setting - it establishes a sense of familiarity and comfort. This photo shows that the background that did not work for dangling the earrings actually looks nice as the pretty background for photographing the earrings lying flat.
Once the photos are all done, I upload them to my computer and make necessary correction to color, exposure and cropping. I always crop first as this eliminates unnecessary dark and bright areas that would affect brightness adjustments. I always photograph at the highest quality available on my camera and then adjust the file size down after adjustments are made so that the photos load faster for viewers.

I hope that this wordy post is useful for someone. I have read lots of articles about photographing jewelry and have felt so intimidated by the recommendations of professionals, including the expensive accessories that are recommended. Maybe someday I will be able to afford a professional camera man for my jewelry, but in the meantime, I'll just continue with trial and error to find what works for me.
A note about copycats - I hope other beginners are able to use this information to improve their photos. So many people help, support and encourage me as I grow as an artist that I enjoy having something to share with others. Having said that, I also hope that I won't see photos of other sellers' items on Etsy that look like my exact product , photographed exactly the same way as mine. That would be rude and I would report it. Instead, use your imaginations and make your work your own!


5 comments:
Great tutorial! I think even experienced sellers can use some hints to tweak their work...or just make it new and fresh again. Thank you for sharing with us.
Great post!
I'm glad so many people are finding the tutorial useful. I often feel very intimidated when I pull out my camera and start trying to photograph my work. There are so many articles written by professional photographers that have made me feel incapable of approaching the task on my own. Trial and error and a willingness to learn is the real key here!
Very informative! Great tutorial for those trying to achieve better jewelry photos for Etsy.
Thank-you; I find earrings the most difficult to photo!
Post a Comment